![]()
Pixaris: An Evaluation Framework for Image Generation


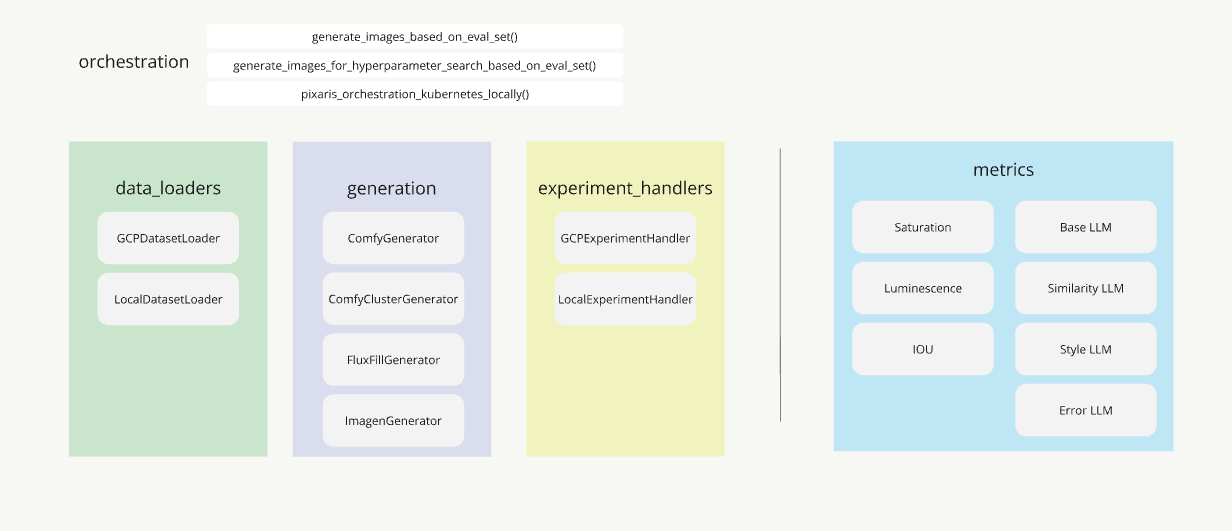
Pixaris is an open-source Python framework designed to streamline the evaluation and experimentation of image generation workflows. Whether you’re a data scientist, AI engineer, or creative professional, Pixaris provides the tools you need to efficiently track, compare, and optimize your image generation projects, with built-in support for tools like ComfyUI and Flux. By tracking metrics, orchestrating experiments, and providing a user-friendly interface for feedback, Pixaris helps you achieve the highest quality results in your image generation endeavors.
Table of Contents
Key Features
Advanced Orchestration: Seamlessly integrates with ComfyUI, Flux, and other tools, simplifying complex image generation workflows.
Comprehensive Metrics: Allows the implementation of custom metrics, including multimodal LLM evaluations, for in-depth analysis of image quality.
Scalable Experiment Tracking: Designed for managing and visualizing large-scale image generation experiments, with a Gradio UI and optional Google Cloud Platform (GCP) integration.
Flexible Hyperparameter Search: Facilitates exploration of a wide range of parameters (e.g., prompt, model, CFG, noise, seed) to optimize image generation tasks.
Local and Remote Workflow Execution: Supports triggering ComfyUI workflows locally, remotely via IAP tunnel, or deploying them onto a Kubernetes cluster.
Integrated Feedback Mechanism: Enables collecting feedback on generated images directly within the Pixaris UI, fostering collaboration and iterative improvement.
Installation
Pixaris requires python = “^3.12”
clone and own
We recommend you to clone the repository and customize it to your needs. Adapt the examples and classes to fit your specific usecase, thats how we use it. To install the cloned repository and make it usable you can simply run:
make install
If you dont have poetry installed, follow these instructions.
If you don’t need some of the functionality, like GCP, Comfy generation on a cluster (kubernetes) or dev, install only parts of the poetry groups. This example excludes kubernetes and dev dependencies:
poetry install --without cluster
If you need dev tools for example for contributing to this project, install with dev tools:
poetry install --with dev
pip
You can also install the latest stable version of Pixaris from PyPI using pip:
pip install pixaris
Online documentation is available here. The open source repository is found here.
Getting Started
The following steps will guide you through setting up and running your first image generation experiment with Pixaris.
Create and Load Your Data Set: Define a
DatasetLoaderto manage your input images, masks, and other data required by your image generation workflow.Set Up Image Generation: Configure a
Generatorto handle the actual image generation process. Pixaris provides pre-built generators, e.g. for ComfyUI (ComfyGenerator) and Flux (FluxFillGenerator).Set Up Experiment Tracking: Utilize an
ExperimentHandlerto specify where your experiment data (generated images and metrics) will be stored.Optional: Set Up Evaluation Metrics: Implement custom metrics (e.g., using LLMs) to automatically evaluate the quality of the generated images.
Define Arguments for Your Experiment Run: Create an
argsdictionary to hold any additional parameters required by your components, such as the path to your ComfyUI workflow or the experiment run name.Orchestrate Your Experiment Run: Use one of the
generate_images_*functions to execute the experiment, passing in your configured components and arguments.View Your Results: Launch the Pixaris UI to visualize the generated images, metrics, and collected feedback.
For example usages, check the examples directory. To set up GCP components, such as GCPDatasetLoader, we use a configuration file. An config.yaml is provided; just adjust it and save a local version.
Summary
At a high level, using Pixaris involves defining a DatasetLoader, ImageGenerator, ExperimentHandler, and any necessary arguments. These components are then passed to an orchestration function like generate_images_based_on_dataset, which handles loading the data, executing the experiment, and saving the results.
Pixaris provides several pre-built components to choose from, such as the GCPDatasetLoader for accessing data in Google Cloud Storage and the LocalDatasetLoader for accessing local evaluation data. You can also implement your own custom components to tailor Pixaris to your specific needs.
Load the examples as a notebook
If you prefer working with Notebooks, install jupytext and you can convert our py files to ipynb.
pip install jupytext
Most common jupytext CLI commands:
# convert notebook.ipynb to a .py file
jupytext --to py notebook.ipynb

# convert notebook.py to an .ipynb file with no outputs
jupytext --to notebook notebook.py
Setting up a data set
Start setting up data you want to use to generate your outputs.
We need a project and a dataset in this project.
In the dataset we have some folders containing the images we use to run an experiment. One folder holds images that are the inputs of one kind.
The structure should look like this, where Object and Mask are the directories containing the images used to generate outputs. Both directories need to hold equivalent images, so image_01.jpg in Object folder has a corresponding mask in Mask folder with the same name.
You can define more or less input directories if you like.
local_experiment_inputs
└───dummy_project
    └───dummy_dataset
        ├───Object
        │   ├───image_01.jpg
        │   └───image_02.jpg
        ├───Mask
        │   ├───image_01.jpg
        │   └───image_02.jpg
This example shows you how to setup a dataset with dummy data for experimenting.
If you already have an existing dataset with your own images, you can upload it to GCP by following this example
Loading your data set
First step: load your dataset using a DatasetLoader. If you have your data in a Google Cloud bucket, you can use the GCPDatasetLoader.
from pixaris.data_loaders.gcp import GCPDatasetLoader
loader = GCPDatasetLoader(
    gcp_project_id=<your gcp_project_id here>,
    gcp_pixaris_bucket_name=<your gcp_pixaris_bucket_name here>,
    project=<your project_name here>
    dataset=<your eval_dir here>,
    eval_dir_local="local_experiment_inputs", # this is the local path where all your datasets are stored
)
Alternatively, you can use the LocalDatasetLoader if you have your dataset saved locally, or implement your own DatasetLoader with whatever requirements and tools you have. A DatasetLoader should return a dataset that can be parsed by an ImageGenerator.
Information on what a dataset consists of and how you can create one can be found here.
Setting up how you are generating images
We implemented a neat ImageGenerator that uses ComfyUI.
from pixaris.generation.comfyui import ComfyGenerator
comfy_generator = ComfyGenerator(workflow_apiformat_json=<WORKFLOW_APIFORMAT_JSON>)
The workflow_apiformat_json should lead to a JSON file exported from ComfyUI. You can export your workflow in apiformat as shown [here][https://raw.githubusercontent.com/ottogroup/pixaris/refs/heads/main/assets/export_apiformat.png].
Pixaris also includes an implementation of FluxFillGenerator, that calls a Flux API for generation. You can implement your own ImageGenerator for image generation with different tools, an API, or whatever you like. Your class needs to inherit from ImageGenerator and should call any image generation pipeline. A generator parses a dataset into usable arguments for your generation. Override the function generate_single_image to call your generation.
Setting up your experiment tracking
To save the generated images and possibly metrics, we define an ExperimentHandler. In our case, we want to have the results saved locally, so we choose the LocalExperimentHandler.
from pixaris.experiment_handlers.local import LocalExperimentHandler
handler = LocalExperimentHandler()
Alternatively, you can choose to save your results remotely in GCP using the GCPExperimentHandler or implement your own class that inherits from the ExperimentHandler. Usually, it would save images and possibly metrics from your experiment.
Optional: Setup evaluation metrics
Maybe we want to generate some metrics to evaluate our results, e.g., for mask generation, calculate the IoU with the correct masks.
from pixaris.metrics.llm import LLMMetric
object_images = [<PIL images with the objects>]
style_images = [<PIL images with style references>]
llm_metric = LLMMetric(object_images, style_images)
As always, it is intended for you to implement your own metrics by inheriting from the BaseMetric class.
There are multiple Metrics Implemented already:
IOU: Intersection Over Union, useful to compare binary images like masks
Luminescence and Saturation: Comparing Image values of the entire image. Optional: Compare values inside and outside of a given Mask
LLM Metrics (BaseLLMMetric, SimilarityLLMMetric, StyleLLMMetric, ErrorLLMMetric): Evaluate by calling Gemini and asking it very specific prompts. You can formulate your prompt yourself by using BaseLLMMetric.
All metrics are implemented once in the examples.
Define args for your experiment run
Depending on the specific components we defined and what they provide, we need to give some more arguments.
args can include whatever data is needed by any of the components and is not given explicitly through parameters of a component. The content of args is highly dependent on the components you use.
For example, additional parameters you want to set in the workflow for the ComfyGenerator can be specified by generation_params.
In args you can set a seed, an inspiration image for the workflow, or which workflow image should be uploaded for documentation. In contrast to the inputs in the dataset, these will be the same for each execution over the workflow within your experiment.
Experiment handling follows the logic, that there is a project, which serves as an organising level, e.g. you might want to experiment with beach backdrops. And then in one project, there can be multiple datasets to work with, e.g. generation of backgrounds for square and landscape format images, beach_square and beach_landscape.
from PIL.Image import Image
PROJECT = "beach"
DATASET = "beach_square"
args = {
    "workflow_apiformat_json": WORKFLOW_APIFORMAT_JSON,
    "workflow_pillow_image": WORKFLOW_PILLOW_IMAGE,
    "project": PROJECT,
    "dataset": DATASET,
    "generation_params": [
        {
            "node_name": "KSampler (Efficient)",
            "input": "seed",
            "value": 42,
        }
    ]
    "pillow_images": [
        {
            "node_name": "Load Inspo Image",
            "pillow_image": Image.open("test/assets/test_inspo_image.jpg"),
        }
    ],
    "experiment_run_name": "example_run",
}
Orchestrate your experiment run
After defining all aforementioned components, we simply pass them to the orchestration
from pixaris.orchestration.base import generate_images_based_on_dataset
out = generate_images_based_on_dataset(
    data_loader=loader,
    image_generator=comfy_generator,
    experiment_handler=handler,
    metrics=[iou_metric],
    args=args,
)
Internally, it will load data, generate images, calculate metrics, and save data using the previously defined objects. In a nutshell: do all the magic :)
Orchestration: Generating Images at Scale
Are you planning to run a huge hyperparameter search to finally figure out which parameter combination is the sweet spot and don’t want to wait forever until it has finished? We implemented two neat solutions to orchestrate image generation at scale.
Parallelised Calls to Generator
By handing over the max_parallel_jobs in args to the orchestration, you can parallelise the calls to any generator. E.g. see here how to parallelise calls to the flux api.
Run Generation on kubernetes Cluster
We implemented an orchestration that is based on ComfyUI and Google Kubernetes Engine (GKE). This uploads the inputs to the cluster and then triggers generation within the cluster. See here for example usage.
If you want to use Pixaris without setting it up manually, you can pull the prebuilt Pixaris Docker image from this repository:
docker pull ghcr.io/ottogroup/pixaris:latest
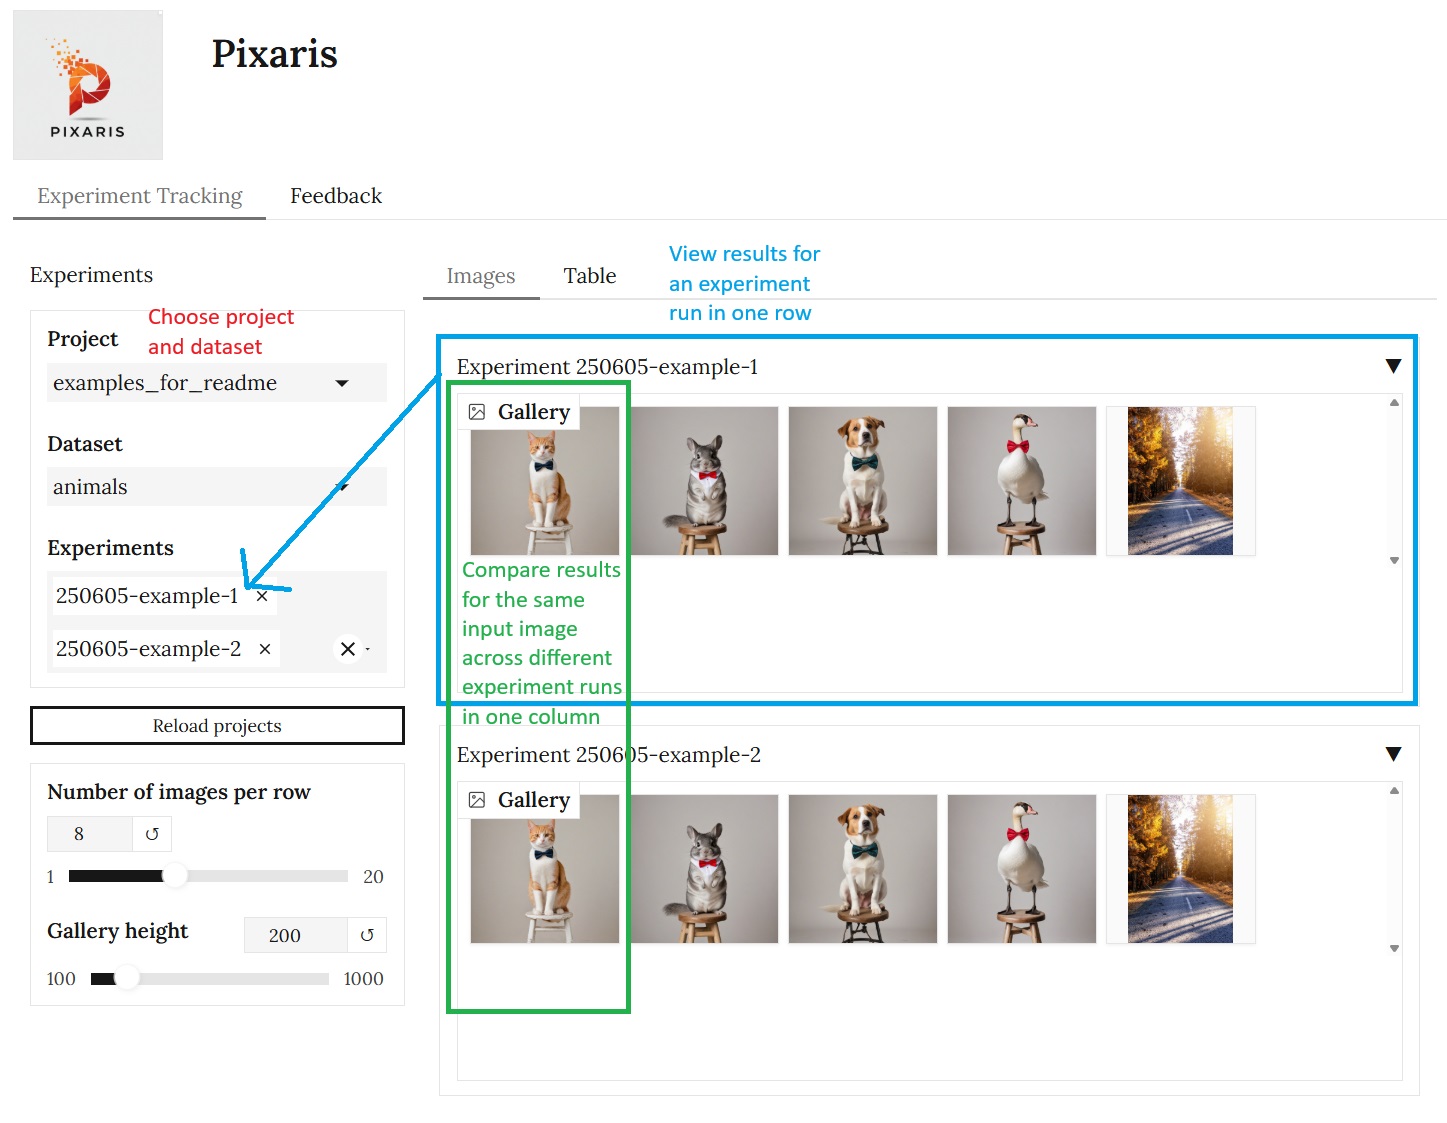
Pixaris UI: Viewing Results and Giving Feedback
You can directly use the GUI to inspect your experiment results and provide feedback on them. For this, you need to define an ExperimentHandler and FeedbackHandler to call launch_ui. They will handle loading experiments and managing feedback. Both experiment handling and feedback handling have an organising level project at the top. This allows you to sort your experiments and feedbacks per use case, topic, time, or whatever you like.

Using local components:
from pixaris.feedback_handlers.local import LocalFeedbackHandler
feedback_handler = LocalFeedbackHandler()
experiment_handler = LocalExperimentHandler()

launch_ui(feedback_handler, experiment_handler)
The UI is then available at http://localhost:8080.
Find code to populate the pixaris frontend with dummy data in this folder and to deploy the frontend in this folder.
Viewing the Experiment Results
In the Experiment Tab, you can see the generated images as well as the results of metrics in tabular form.
Giving Feedback on Generated Images
When reviewing your generated images, Pixaris UI lets you rate which images are good and which aren’t. To do this either alone or with your team, you can use Feedback tab in the UI. feedback_iterations are independent from experiment datasets. You could e.g. have a feedback_iteration that consists of your favorite experiment runs, or you could freely generate a bunch of images and form them into a feedback_iteration. It is completely up to you. Here you can see some cute chinchillas and how the author would rate the images.

For a deeper understanding of feedback_iterations and how to set them up, see here. These scripts provide a quick way to populate the frontend with test data and understand how the feedback systems work.
Naming Conventions
For clarity, we would like to state what terminology we use in Pixaris:
Workflow Execution: Running a workflow for a single input, e.g., object image + mask image.
Dataset: Set of evaluation inputs, e.g., 10 * (object image + mask image).
Experiment Run: One eval set gets run with 1 workflow and 1 set of generation_params.
Hyperparameter Search: One workflow, one eval set, multiple sets of generation_params, which results in multiple experiment runs.
Generation Params: Set of parameters to execute a single run.
Hyperparameters: Multiple sets of different Generation Params, used in hyperparameter search.
args: Includes inputs, e.g., can include workflow apiformat, input images, generation params, save directory, etc.
Contribute
We encourage contributions to Pixaris! If you’d like to contribute:
Fork the repository.
Create a new branch for your feature or bug fix.
Submit a pull request with a clear description of your changes.
For more detailed guidelines, see our Contributing Guide.
Release
Update the version in
pyproject.toml.Create a new release. Follow GitHub Release Docu.
Validate that the github action
release_new_version.yamlwas successful.
License
Pixaris is released under the GPL-3.0 License. See the LICENSE file for details.